User guide
Track every planning application you care about, in one place
PlanPulse checks council planning portals for you, adds new applications you submit as agent wherever we can, and emails you when anything changes. This guide covers both account types. Wherever a Planning team works differently, you’ll see a green Planning team note.
Planning consultant£19.99/mo + VAT
For one person tracking the applications they raise. Consultants, surveyors, architects.
- Your own dashboard, map and calendar
- Email alerts on changes
- Monthly, or yearly at £214.99 + VAT
Planning team£99.99/mo + VAT
For a practice that wants one shared view of every application the team raises.
- Up to 10 people, one admin or more
- Shared portfolio and notes
- Admin manages members and billing
Getting started
Every account starts with a 30-day free trial. You don’t need a card.
Create your account
- Go to Pricing and choose Start 30-day free trial on the plan you want.
- Under Choose your account type, pick Planning consultant (“I want to track planning applications I raise”) or Planning team (“…my team/company raise”).
- Enter your full name, email and a password with at least 8 characters, including an uppercase letter, a lowercase letter and a number. Or use Continue with Google.
- Tick I agree to the Terms of Service and select Create account.
- Open the activation email and click the link. It lasts 24 hours. If it doesn’t arrive, use Resend activation email.
Signing in
Sign in with your email and password, or with Google. Tick Remember me to stay signed in for 30 days; otherwise you’ll be asked again after 24 hours. You’ll land on your Dashboard.
Forgotten your password? Choose Forgot password? and then Send reset link. The link works for one hour.
Finding your way around
The menu across the top of every page:
- Add Application
- Search a council and start tracking an application.
- Dashboard
- Everything you track, with filters, sorting and export.
- Map
- Your tracked applications as pins.
- Updates
- A change log of what’s moved on each application.
- Calendar
- Target decision dates by month, with calendar sync.
- Tags
- Your colour-coded labels for applications. See Tags.
- Councils
- The councils PlanPulse covers.
- Team
- Your members and invitations. You’ll only see this if you’re on a team.
- My Profile
- Account details, subscription, theme and email settings.
Your trial
A badge next to the PlanPulse logo shows how long you have left, such as Trial · 12 days left. It turns amber in the final week. To keep going, subscribe from My Profile at any point during or after the trial.
Adding applications
Applications get onto your Dashboard in two ways: PlanPulse adds the ones you submit as agent, and you can search for and track any others.
Applications we add for you
You don’t have to add everything by hand. Every weekday, PlanPulse collects the applications submitted to the councils we cover on the previous day, including the agent named on each one. Where the agent is you, we add the application to your Dashboard automatically.
- How we match you: by the email address on your PlanPulse account, or by your agent name. We only use a name match when the name points to one PlanPulse user, and we check it before adding anything.
- How you’ll know: you get an email titled “reference has been added to your PlanPulse account”. You don’t need to do anything, because it’s already being tracked and you’ll get alerts as it changes.
- Where we can: this depends on the council publishing the agent’s details, so some applications can’t be matched. Anything we miss, you can add yourself with Add Application.
Search a council
- Select Add Application in the menu.
- Choose the Council. Start typing to filter the list, which is grouped by region. You search one council at a time.
- In Address, postcode, or reference, enter an application reference, a postcode, or a house number and street. The box shows an example reference in that council’s format.
- Select Search.
PlanPulse searches the council’s own portal live, so some councils are slower than others. If it takes more than a few seconds you’ll see a message. Some councils can take up to 60 seconds.
| Application | Status | Dates | Actions |
|---|---|---|---|
14 Alder Road, Bristol BS6 7AH 24/03118/H | Pending consideration Until target: 9 days | Submitted 02/09/2026 Target 07/10/2026 | View detailsTrack this app to get alerts on changes |
14A Alder Road, Bristol BS6 7AH 23/05502/F | Granted subject to conditions | Submitted 11/10/2025 Decided 04/12/2025 | View detailsRemove |
Track an application
Select Track this app to get alerts on changes on the result. It goes straight onto your Dashboard, and you’ll be emailed when it changes. Use View details first if you want to check the proposal, applicant, agent, case officer and key dates. View ↗ opens the application on the council’s website.
When a search finds nothing
- Search by postcode, or house number and street, rather than the full address.
- Planning Portal references that begin
PP-can’t be searched. Use the council’s own reference. - Searching for words from the proposal won’t work.
- If you typed a reference, PlanPulse shows you the format that council uses.
If a search matches more applications than the council’s system will list, you’ll be asked to narrow it with a full postcode or the reference.
Your dashboard
The Dashboard, titled Planning Applications Portfolio, lists everything you track and how long each application has left.
Find what you need
- Filters: status, decision and LPA. The LPA filter can pick a whole region. Use Clear filters to reset.
- Tags: show only applications with one or more of your tags. See Tags.
- Search your portfolio by postcode or reference.
- Sort by target date (soonest first by default), date submitted, days elapsed, LPA, latest council update or latest note. PlanPulse remembers your choice.
- Switch between card and table view.
Reading a status
Status badges show the council’s own wording, coloured so you can scan quickly:
ApprovedRefusedWithdrawn / decidedAppealIn progress
On each application
- LPA
- Somerset
- Days elapsed
- 41
- Days until target
- 15
Shared by Priya Shah
- Details
- The full record, including key dates, documents and comment counts. You can also set a Custom Target Date here. It replaces the council’s date everywhere in PlanPulse: days until target, sorting and the calendar.
- Refresh
- Check the council portal for this application now.
- History
- Every recorded change, such as status, decision, dates, and the number of documents or comments.
- Notes
- Your own notes, up to 2,500 characters each. Links are clickable.
- + Tag
- Put your tags on this application. See Tags.
- Remove
- Stop tracking. You can add it again from Add Application.
Refresh and download
PlanPulse checks undecided applications automatically every weekday morning. To check sooner, use Refresh at the top of the Dashboard. You can refresh everything with a target date today, or in the past 3, 5 or 10 days.
Download saves the list you’re looking at, with its filters applied, as an Excel file named like planpulse-applications-2026-09-28.xlsx.
Tags
Tags are colour-coded labels you put on applications, such as a client’s name, “Urgent” or “Heritage”. Use them to group your work, then filter the Dashboard, Map and Calendar by them.
Create a tag
- Open Tags in the menu at the top of the page.
- Select New tag.
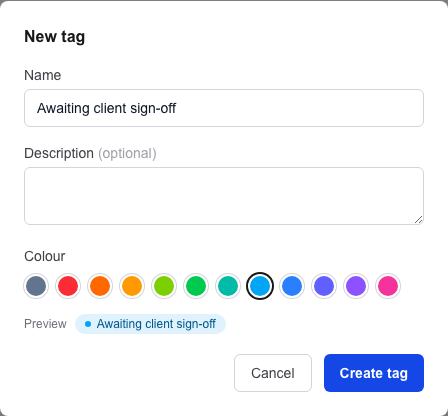
- Give it a name (up to 40 characters) and pick one of the 12 colours. A description is optional (up to 200 characters).
- Select Create tag.
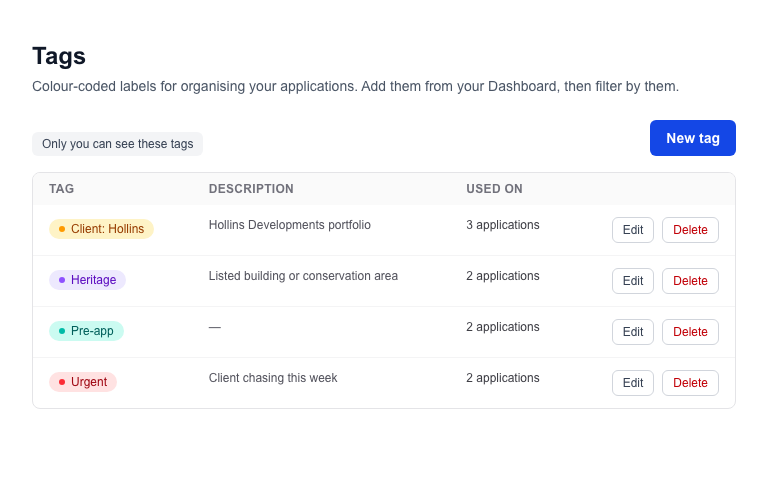
The Tags page lists every tag, with its description and how many of your applications carry it.
Tag an application
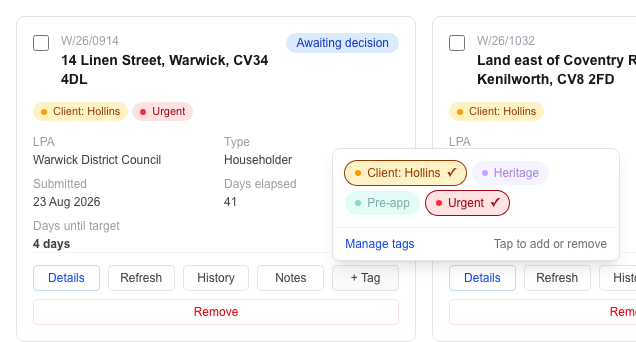
On the Dashboard, select + Tag on an application’s card. Tap a tag to add it, and tap it again to take it off. Changes save straight away. You can also tag from the table view, and from the Tags section in an application’s Details.
Tag many at once
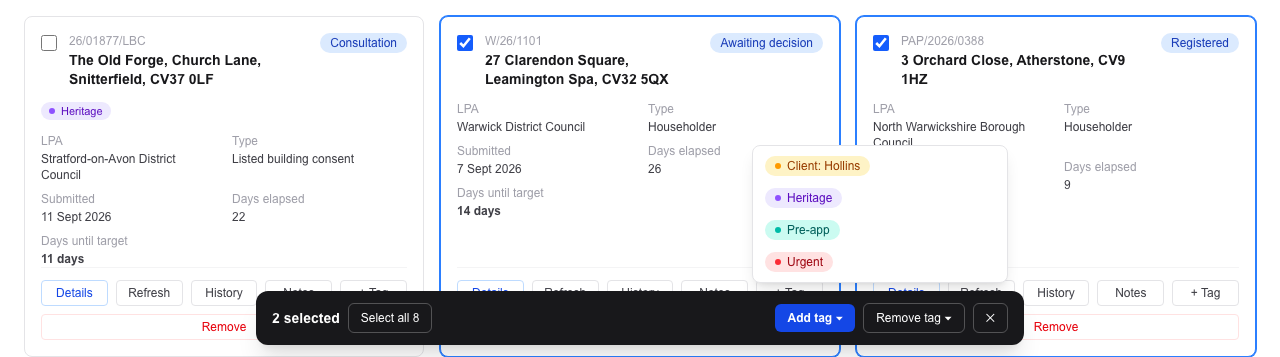
Once you have at least one tag, each card has a tick box. Tick the applications you want, and a bar appears at the bottom of the screen:
- Add tag or Remove tag applies one tag to every ticked application.
- Select all ticks everything the current filters show.
- You can tag up to 500 applications at once.
Filter by tag
The Tags row under the Dashboard filters shows each tag with how many of your applications carry it. Tap a tag to show only those applications. Pick several to see applications with any of them. Clear filters resets the tags along with the other filters, and so does typing in the portfolio search.

On the Map, the Calendar and in downloads
- Map
- The same Tags row filters the pins. A pin’s popup and side panel show its tags, and you can change them there.
- Calendar
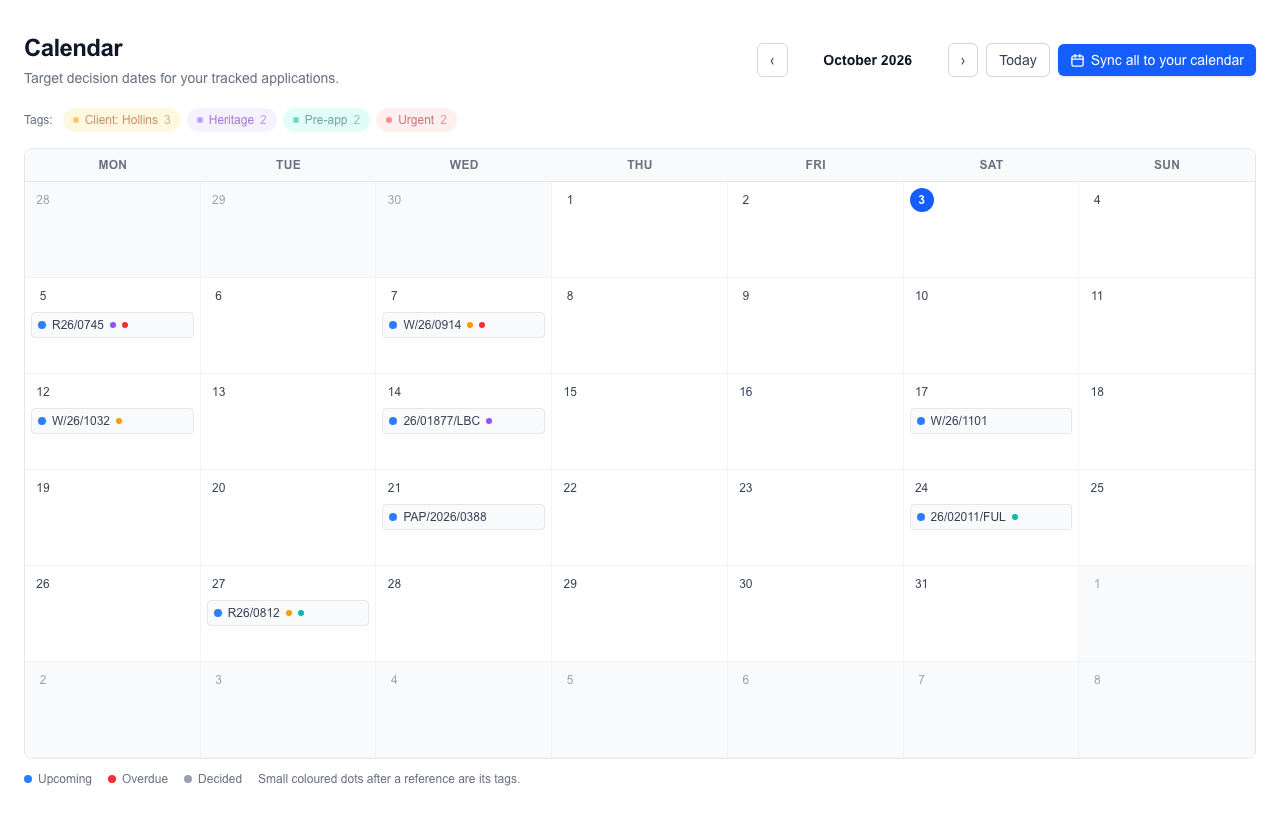
- Coloured dots after a reference are its tags, up to three. The Tags row filters the month. On a phone the dots are hidden to save space, but the filter still works.
- Download
- The Excel file has a Tags column. Filter by a tag first to download just those applications.
Edit or delete a tag
On the Tags page, use Edit to rename a tag or change its colour. It changes on every application that carries it. Delete shows how many of your applications carry the tag before you confirm. Deleting a tag only removes the label. The applications themselves aren’t affected.
Alerts and emails
PlanPulse can send you four kinds of email.
| When | Turn it on or off | |
|---|---|---|
| Status change “24/03118/H has been updated” | When a weekday check finds something has changed on a tracked application, such as status, decision, a date, or new documents or comments. | Always on while you track the application |
| Added to your account “24/03118/H has been added to your PlanPulse account” | When we add a newly submitted application that names you as the agent. See Applications we add for you. | Ask us through Contact us to stop adding applications for you |
| Weekly summary | Monday mornings | My Profile → Notifications → Weekly summary |
| Target date reminder | A set number of days before a target date. You get one email a day listing everything due on that date. | My Profile → Target date reminders. Choose 1 to 20 days; the default is 5. |
You won’t get an alert the first time PlanPulse checks an application you’ve just tracked. Alerts start from the next change after that. Each alert has a View on PlanPulse button.
Map, Calendar and Updates
Map
Your tracked applications appear as pins on OpenStreetMap. The same five tiles as the Dashboard filter the pins. Click a pin to see the proposal, applicant, agent and case officer, with Refresh, History, Notes and Remove buttons. Only applications PlanPulse could place on the map are shown. If you use tags, a Tags row under the tiles filters the pins too.
Calendar
A month view of target decision dates, marked Upcoming, Overdue or Decided. Small coloured dots after a reference are its tags, and the Tags row above the month filters the calendar.
- Sync all to your calendar subscribes Google Calendar, Outlook or Apple Calendar to your dates, and they stay up to date. Apple and Outlook usually pick up changes within the hour. Google can take up to a day.
- For a single application, use Add to calendar. You can add it once (Google, Outlook, Yahoo or a
.icsdownload) or subscribe to keep it in sync.
Updates
A list of applications with recorded changes. Pick one to see its Change Log. You can filter to the last 7 days, the last 30 days or all changes.
Your account and billing
Everything lives under My Profile.
Subscribing
- Open My Profile and find Subscription.
- Planning consultant only: choose a Billing period, monthly or yearly. Yearly saves 10%.
- Select Subscribe and pay on the secure Stripe page. If you have a promotion code, enter it there. VAT is added at checkout.
Once you’re subscribed you can:
- Manage payment method
- View and download Invoices as PDFs
- Cancel subscription: you keep access until the end of the period you’ve paid for and won’t be charged again. Resume subscription reverses a cancellation before it takes effect.
Other settings
- Appearance: Light, Dark or System.
- Notifications: weekly summary and target date reminders. See Alerts and emails.
- Compare plans, to see what each plan includes.
To change plan, or to discuss a Custom plan, use Contact us → Request an upgrade.
Running a team
This section is for Planning team accounts. The Team page lists your members. Admins also invite people and manage them there.
- Sam OkaforLast seen todayAdminIntegrated
- Priya ShahLast seen 2 days agoIntegrated
- Tom ReeveLast seen last weekStandalone
- j.lowe@example.co.ukNever signed inInvited
Integrated or standalone
You choose one of these for each member when you invite them. You can change it later.
| Compare | Integrated member | Standalone member |
|---|---|---|
| Sees | Every application the team saves | Only the applications they save, plus any shared with them |
| Their own applications | Visible to all integrated members | Nobody else sees them, including admins |
| Alerts | The team’s alerts | Only for their own applications |
| Can be an admin | Yes | No |
| Typical use | Colleagues working one shared caseload | Someone who needs a team seat but keeps their own caseload separate |
Invite a member
- Go to Team and find Invite a member.
- Enter their email address and choose Integrated member or Standalone member.
- Select Invite. They’ll get an email titled “You’ve been invited to join your team on PlanPulse”.
- They click Accept invitation, set their name and password, and select Join the team. Invitations last 7 days.
Managing members (admins)
- Resend invite / Cancel invite
- For people who haven’t joined yet.
- Send password reset
- Emails the member a one-time reset link that lasts one hour.
- Make integrated / standalone
- Changes what they see. The confirmation tells you how many applications only they track.
- Make admin / Remove admin
- A team always keeps at least one admin. Standalone members can’t be admins.
- Remove
- Deletes the member’s account. Their tracked applications move to you, and their notes stay, labelled “removed”.
Admins can also Rename the team, up to 100 characters. Admins can’t remove themselves or change their own membership type, so ask another admin.
Sharing an application
Use Share on a Dashboard card to give a specific application to a teammate who wouldn’t otherwise see it.
- A standalone member can share with anyone on the team.
- An integrated member can share with standalone members, because other integrated members can already see it.
The people you share with get an email. The application appears on their Dashboard marked Shared by with your name, and you all see the same notes on it.
Getting help
Use Contact us at the top of any page and choose:
- Feedback
- A suggestion or general comment.
- Report a problem
- Add the council and planning reference if the problem is with one application.
- Request a council
- Ask us to cover a council we don’t cover yet.
- Request an upgrade
- Change plan or discuss a Custom plan.
You can also email hello@planpulse.org or use the WhatsApp button in the corner of the screen. There’s more in the FAQ.